Place a Statement on Hold
There are times when you might want to put a Statement on Hold for one or more Encounters or never to send a Statement to a specific Patient/Guarantor. There are several ways that you can prevent a Statement from creating:
- Encounter Dashboard: Use a Tag to Hold the Statement. If all Encounters should be held, choose Hold Guarantor.
- Patient Demographics screen: Once marked as Hold Statement, all future encounters will not be on a statement
- Patient Dashboard: Multiple Encounters can be chosen at once to put on Hold
- Modify Encounter Screen: An individual Encounter can be put on Hold
- Insurance Library: Use to put all encounters as Patient not Responsible
Use Tags to Hold Statements
Use Tags to put a specific Encounter or all Statements for a specific Guarantor on hold. Example: If a Patient has multiple Encounters that are in Patient Responsibility, but there is one Encounter that you do not want to appear on the Statement, assign a Tag to that Encounter to Hold it.
Select "Hold Statements" on the Patient Demographics Screen
If this option is used, no statements will be created for any encounters posted after this change. This does NOT change any existing encounters. Those encounters will need to be changed on the Patient Dashboard or on the individual Encounters.
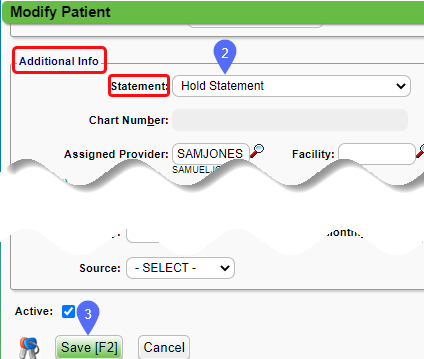
- From the Patient Dashboard, select Edit in the Demographics panel.
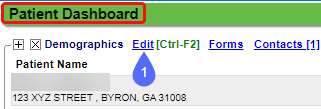
- From the Additional Information Panel, select the Statement dropdown and choose Hold Statement.
- Select Save [F2].
Hold Encounters Statements from the Patient Dashboard
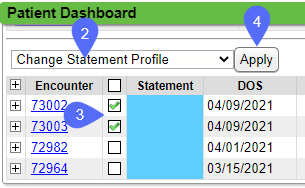
From the Patient Dashboard, you can override the current Statement Profile, and it will affect only the Encounters that are chosen.
- From the Patient Dashboard, choose the dropdown for Select Action.
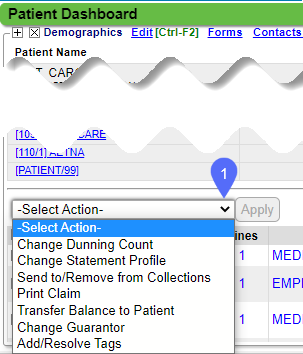
- Select Change Statement Profile.
- Check the box on the Encounters where the Statement Profile should be changed.
- Select Apply.
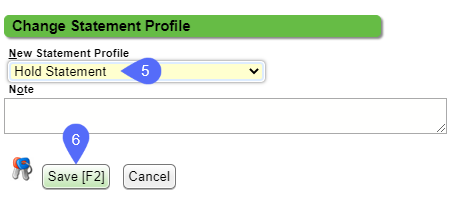
- In the Pop-up, choose Hold Statement from the New Statement Profile dropdown.
- Select Save [F2].
Hold Statements using Modify on the Encounter Dashboard
This action overrides the Patient Demographic Statement Profile setting and will affect only this Encounter.
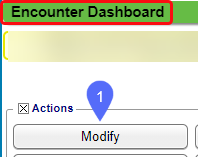
- From the Encounter Dashboard, select Modify.
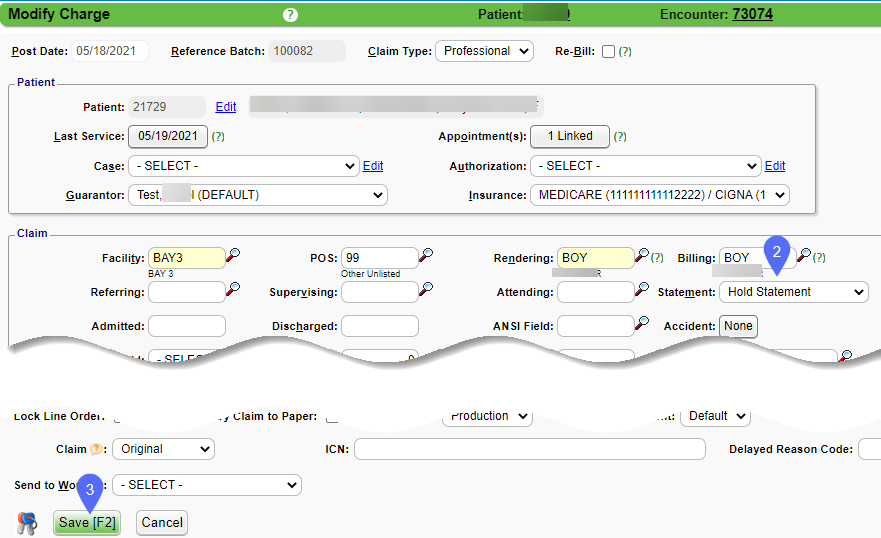
- In the Claim panel, choose the dropdown for Statements and select Hold Statement.
- Select Save [F2].
Mark a Patient not Responsible in Insurance Management
This setting overrides all other Statement Profiles on the Patient Demographics, Patient Dashboard, and Encounter Dashboard.
All Encounters that are in Patient Responsibility and have this Insurance Profile will never generate a Statement unless a User changes it.
- In the Policy Breakdown panel on the Encounter or Patient Dashboard, select the Insurance Management link.

- On the Insurance Management screen, select Default on the Insurance Profile.

- Change to Patient not Responsible.
- Select Save [F2].

Example: Since many state Medicaid plans do not allow the Provider to balance bill the Patient, the Insurance Profile can be marked as Patient not Responsible.
Learn More
Related Articles
Statements/Invoices Overview
Statements/Invoices Overview Statement and Invoice Profiles must be set up before Statements can be sent. Statements and Invoices must be set up separately. Both require Proofs to be approved. Statement Profiles Setup Statement/Invoice Test Batch and ...Statements/Invoices Troubleshooting
Troubleshoot Statements/Invoices Check the Statement Batch Status Created: The Batch has been created, but not uploaded. Uploading: The Batch is in the process of Uploading to the Statement Department. Accepted: The Statement was received by the ...Statement/Invoice FAQs
Statement/Invoice FAQs Balance Forward on Statements/Invoices How do I show/exclude Balance Forward on Statements? How do I show/exclude Balance Forward on Invoices? Batch Why did a Statement not Batch? Statements/Invoices Troubleshooting Delete a ...Statement History/View Patient Statements & Notifications
Statements > History > Guarantor number > Statements/Notification History Panel OR Patient Dashboard > Select the Guarantor's Name > Statement/Notification History A list of all Statements and Notifications is viewable on the Statement/Invoice Batch ...Patient Responsibility
Patient Not Responsible A Patient can be marked as not Responsible in Insurance Management, on the Patient or Encounter Dashboard, Patient Demographics, and on the Insurance in the Insurance Library. If the Patient is marked not responsible on the ...