Old PM Patient Balances: Balance Forward
Most groups have Patient balances to bring forward from their old system.
- The benefits of moving the balances are reducing time spent in two systems and the ability to send just one Statement to each Guarantor.
- The balance should be written off in the old system after it has been moved to your new PM System.
Retrieve the Patient Balances from the Old PM
Before each Statement run, generate a report from your old system for Patients that have a Patient Balance only (not Insurance balances).
- Do this before each Statement run to manage the project in smaller pieces and ensure that you are not working the same Patient more than once.
Remember to write off the balances in your old system every time you run statements in the old system.
Process for Moving a Debit or Credit from a Legacy PM
Create an Encounter for the Balance
- On the Patient Dashboard, select the Post Charge link in the Balance panel.
- Insurance: Choose SELF PAY for the Insurance since this is a Patient balance.
- For reporting purposes, choose the exact Facility and Provider that should get credit for any Payments made to this Encounter.
- Use MISC for the Dx 1.
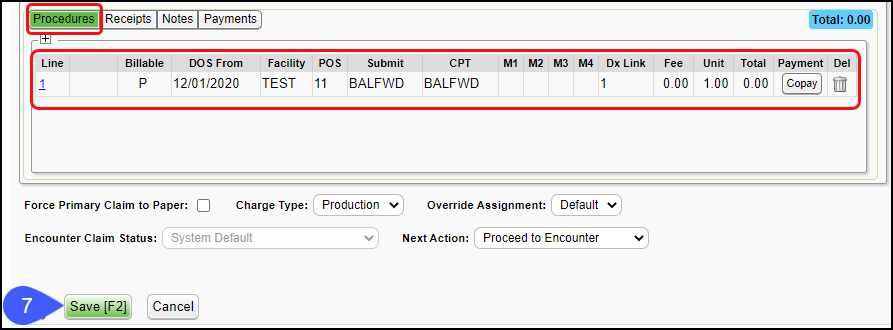
- Add a Procedure line.
- DOS should be the DOS from the Legacy PM (Old PM).
- Use BALFWD for CPT.
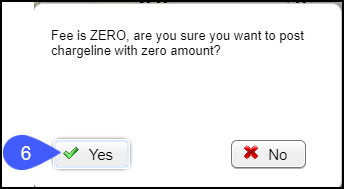
- Use 0.00 for Fee and tab through the fields to display the Procedure line in the window below.

- Select the Yes button on popup.
- Select Save [F2].
Transaction Codes
If you do not have custom Transaction Codes set up to Manage Credit/Debit from an Old PM System, create them before continuing with the steps below.
- When posting the Balance Forward to the Encounter, use one of the Transaction Code methods below.
- If the Transaction Code has already been created, go to Step 3.
- Method 1: Create one Transaction Code to use for both debit and credits, such as BALFWD set up as a debit.
- Use a positive amount for money owed to you.
- Use a negative amount for money you owe the Patient.
- Method 2: Create two Transaction Codes to use for debits and credits (used in the example below).
Create the Transaction Code(s)
Debit Transaction Code
- Use the Debit Transaction Code for bringing forward a debit balance (the Patient owes you money), such as OSDEBIT (Old System Debit)
Credit Transaction Code
- Use the Credit Transaction Code for bringing forward a credit balance (you owe the patient money), such as OSCREDIT (Old System Credit).
- (The System will automatically make this a credit when posting the Adjustment.)
Add the Balance from the Legacy PM to the Encounter
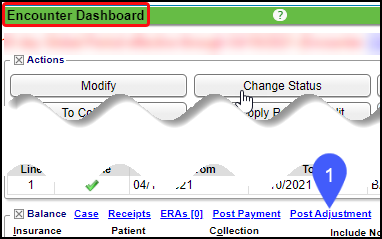
- From the Encounter Dashboard, select Post Adjustment link in the Balance panel.
- If this is done from the Patient Dashboard, you must choose the Encounter on the Post Adjustments screen before performing the next step.
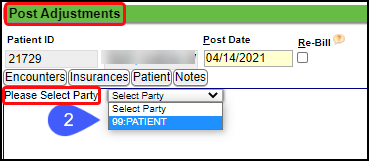
- Select Party: 99-Patient.
- Choose the Adjustment Code that has been created for the Balance Forward transactions.
- Enter the amount being brought forward from the Old PM.
- One Transaction Code Method: Use a negative amount for a credit and a positive amount for a debit.
- Two Transaction Code Method
- Choose the Credit Transaction Code for money that you owe the Patient, and enter the amount as a positive amount (do not enter a negative amount). The System automatically does this for you.
- Choose the Debit Transaction Code for money that the Patient owes you, and enter the amount as a positive amount.
- Select Save [F2].
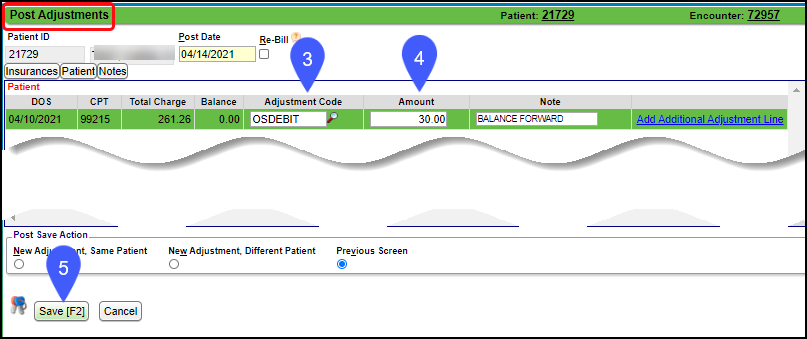
Move a Debit or Credit to an Existing Encounter
From the Encounter or Patient dashboard
- Select Post Adjustment.
- Post using the Custom Adjustment Code(s).
Example:
The patient balance before Old PM Balance Forward was $1162.13.
A balance forward was done to bring over an Old PM balance of $150.00. The patient balance is now increased on this encounter to $1312.13.
Related Articles
Create a Patient Receipt/Post Payment Manually
Patient Receipt Creation If the Copay was not entered during the Check-in/Check-out workflow or if your Practice does not use the Calendar: Enter NR in the Navigation box (Go-Cuts) shortcut; Use the Post Payment link on the Patient Dashboard; Use the ...Post an ERA with Old System Payments
Post an ERA with Old System Payments All Payments on the ERA are for Your Old (Legacy) System The Legacy System Encounters will be statused with an 'O'. The System recognizes the New System Payments by the Account number (Patient ID plus the ...Patient Dashboard: Balance Panel
Balance Panel Features Navigation Links Post Charge Opens the Post Charge screen to add a new Charge for the Patient. ERAs Shows the number of ERAs, and the link opens the existing ERA List that is associated with the Patient. Cases Shows the number ...Payment/Receipt FAQs
Adjustments/CARC Codes How can I post additional Adjustments? Post an Adjustment from: Payment Dashboard Patient Dashboard Encounter Dashboard Learn More Multiple Adjustment Lines Rebill the Claim from the Adjustment screen Adjustment Transaction ...Post a Pre-Payment
Post a Pre-Payment to an Incomplete Charge This workflow is for groups who choose not to leave Receipts in Escrow for prepaid services. This process works well for paying Providers before services are rendered. Create an Incomplete Charge On the Post ...