Filter for Custom Fields on a Receipt
Filter for Custom Fields on a Receipt
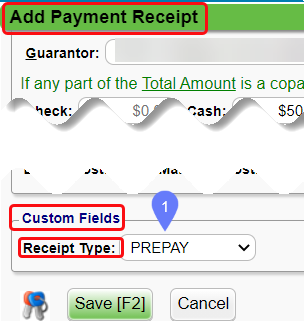
- The Custom Fields must be completed on the Add Payment Screen when the Receipt is created.
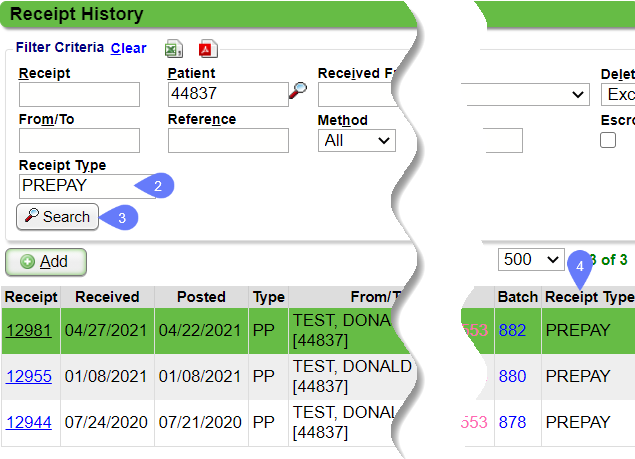
- On the Receipt History screen, filter for Receipts Custom Field.
- In the following figure, it is Receipt Type. This can be done on Receipt History on the Payments Dashboard or from Receipts on the Patient and Encounter Dashboards.
- Click Search.
- All Encounters with the Receipts Custom Field completed on the receipt will be in the list. The Receipts Custom Fields option shows as a searchable field on the Receipt Reports (such as Receipt Management, Custom Receipt Query, and Custom Transaction Query).
Related Articles
Add/Modify Custom Fields
Add a Custom Field If you set the Data Type on the Custom Field to Text, you will get additional options that are not available for the other Data Types. See Text Data Types for more information. From the Admin Dashboard, select Custom Fields. Select ...
Custom Query Reports Hub
Custom Query Reports (CQR) Custom Encounter Query = CEQ Custom Receipt Query = CRQ Custom Transaction Query = CTQ Custom Patient Query = CPQ Custom Appointment Query = CAQ Overview Filters and Criteria Create a CQR CEQ CRQ CTQ CPQ CAQ Overview Custom ...
Custom Query Reports Overview
Custom Query Reports Overview Custom Query Reports can be custom-built to produce the output and columns you want specifically. A Default Report is System delivered for each Custom Query Report. They all operate in the same way but pull specific ...
Custom Fields Overview
Custom Fields can be added to any data entry screen to track specific data, such as how a patient heard about your practice. These fields provide the flexibility to capture unique or specialized information that is important to your specific workflow ...
Custom Receipt Query (CRQ)
The Custom Receipt Query is driven by entered/posted Receipts. This report will match the Receipt Management report if it is run by the same parameters: Total By - Receipt - Number Receipt - Is Registered Type = Yes Post Date Range Reports > ...