Calendar Display Profiles
Display Profiles
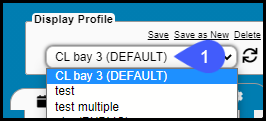
You can personalize your Calendar using Default Profiles. A new Default can be saved along with multiple other Profiles. The Profile that you set as Default will be the one that displays when you access your Calendar. To see other Display Profiles that you have created, use the dropdown.

If you do not have access to Display Profiles, or you cannot Save a Display Profile, contact your System Administrator. This is permission driven.
Create and Save a New Display Profile
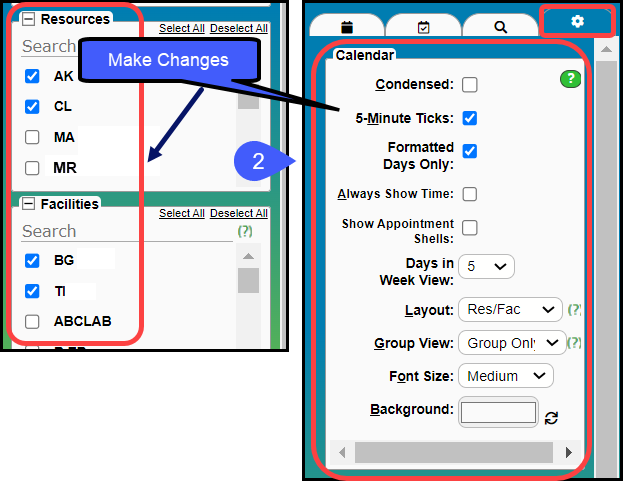
- Select the Resources from the Resources list on the left menu that you want to see on the Calendar. The Search Field can be used to find the Resources.
- Check the boxes in the order in which they will appear on the Calendar.
- Select or use the Search Field to find your Facility (not required).
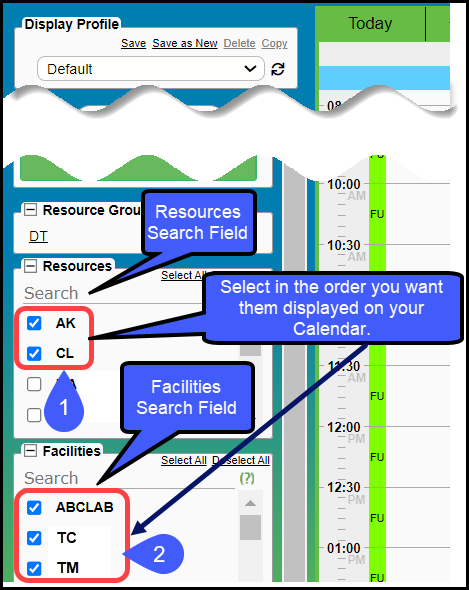
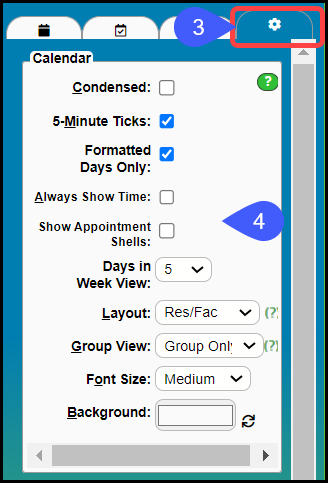
- Select the Setting Tab
- Check the boxes that apply to the way you want your Calendar to look.
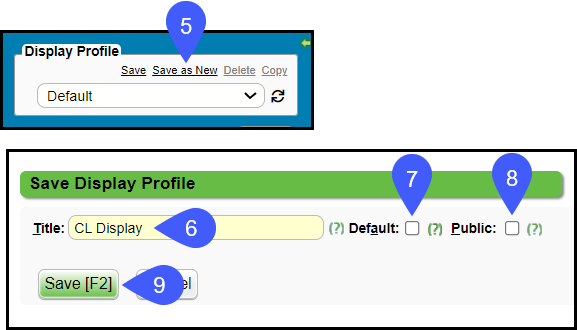
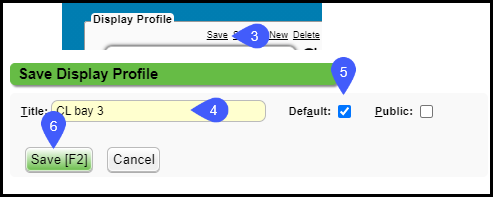
- Select Save as New to create a new Profile. (This will not overwrite the Current Display.)
- Save will overwrite the current Display Profile.
- Enter a Title for the new Display Profile.
- Check Default if you want to display this Profile by Default when you access the Calendar.
- Public: This is controlled by User Permission.
- Select Public for others to see and use this Profile.
- Select Save [F2].
Edit a Display Profile
- Choose the Profile from the Display Profile panel.
- Make your changes. For example, add provider, change color, or font.
- Select Save to overwrite the previously saved profile.
- The Title can be changed or left the same.
- Check to make this profile the Default. Uncheck if it is not the Default.
- Click Save or press F2.
Copy a Display Profile
Selecting Public, copies the Profile to other users with the option for each user to make it their default. This is an easy way to copy a Display profile to every user in your group. Access to this feature is controlled by User Permissions.
Delete a Display Profile
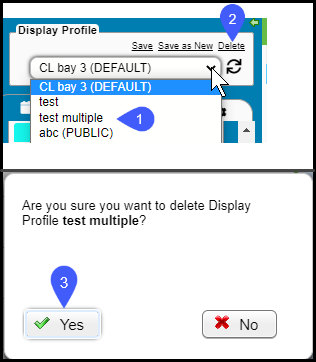
- Choose the Display Profile from the sidebar of the Calendar.
- Click Delete.
- Click Yes.
Create a Today Display Profile
Scenario:
- You have a large number of Resources.
- Several Resources are not in the office today.
- You deselect them on the left menu.
- If you refresh the screen or you leave the screen, the Resources become checked again.
Resolution 1: Create a Today's Display Profile.
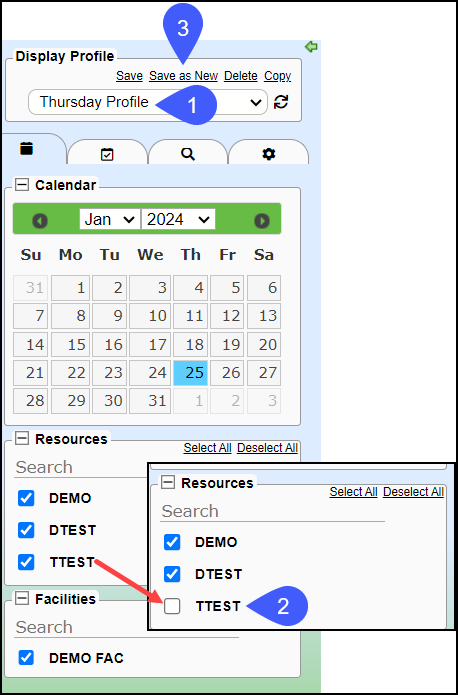
- Select your Display Profile for the Day.
- Uncheck the Resources that are not there that day.
- Select Save as New.
- If you use Save, you will permanently change the original Display Profile that you have selected.
- Example: You have a Display Profile called Thursday which you only use on Thursday, and you want to change it for a day where one or more Providers are out.
- If you choose the Thursday Profile, uncheck the absent Providers, and use the Save link, you will permanently overwrite your Thursday schedule.
- To keep from permanently changing Thursday's Profile, use Save as New and name it Today's Profile.
- Title: Enter Today's Profile
- Default: If you leave this checked, the Calendar will always default to that view.
- If you do not make this the Default, and you leave or refresh the screen or get logged out, you will need to select the Today Profile again to restore the changes you made for the day.
- Public: Do not make this public because you will not be able to delete from other User's Display Profiles.
- Select Save [F2].

Delete the Today's Profile
- To create another "Today's Profile," delete the current Today's Profile and follow the directions above.

Resolution 2:
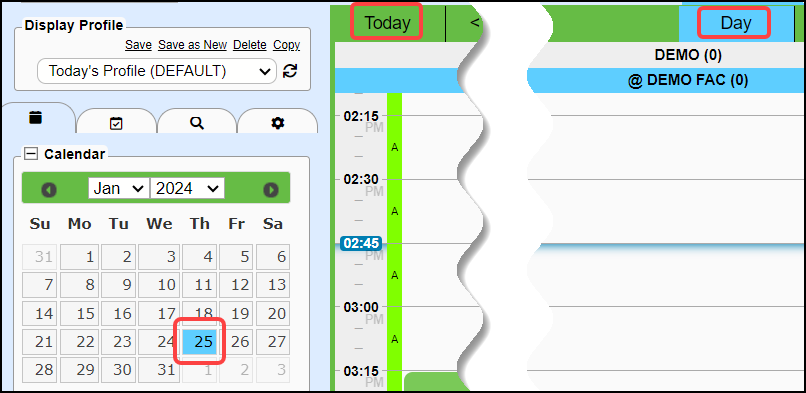
To restore your most recent changes to the Resources on your Calendar, select Today, the Day on the Calendar, or Day on the Banner.
Related Articles
Calendar Navigation Overview
Access the Calendar The Calendar can be accessed using one of the following methods. Enter "CAL" into the navigation box. Select the Calendar icon on the top-right menu. Select the Calendar button on the Home Dashboard. Select Scheduling on the left ...Top Menu Calendar Navigation
Hide the Left Side Menu To hide the left side Navigation panel, select the green arrow above the Display Profile. To display after hiding, hover over the left side of the Scheduling Screen. To make the menu display all the time, hover over the left ...Eligibility Display on the Calendar
If you use the Eligibility feature, the Calendar view displays the Patient's Insurance Eligibility. If you do not want the Eligibility icon to display on the Calendar, uncheck the Eligibility option. Select the Settings Tab. In the Appointment panel, ...Statement/Invoice Profiles Setup
Statement/Invoice Profiles must be set up before Statements or Invoices can be batched. If the Statement Profile is selected as the Default, it will be attached to new Patients automatically. Other Statement/Invoice Profiles can be created to be used ...Add an Appointment
Prevent Creation of Simultaneous Appointments in the Same Slot To prevent Users from creating Appointments in the same slot, the System displays this message: Warning? User XXX is also editing this slot. Add an Appointment to the Calendar Select the ...