Denial Worklist Overview
 A Payer Rejection is not the same as a Payer Denial. A rejection gets kicked back before it enters the Payer's system. A Denial has been adjudicated, and Payment has been denied.
The Denial Worklist is populated when an ERA is applied, and at least one line item on the Remit has a zero dollar Payment and is statused to DW on the ERA Remit Items screen.
- The Denial Worklist is interactive with links to the:
- Encounter Dashboard
- Patient Dashboard
- ERA
- Remit
- Receipt
- In the Claim Type column, the plus icon can be used to:
- View whether this is a Primary, Secondary, or Tertiary Payer.
- Line item details
- CARC and RARC codes
- Charge, Allowed, and Paid Amounts
- Tags Column: Displays Tag(s) if the Encounter has one or more Tags attached to it.
- Use the Filter Criteria to define the content of the list.
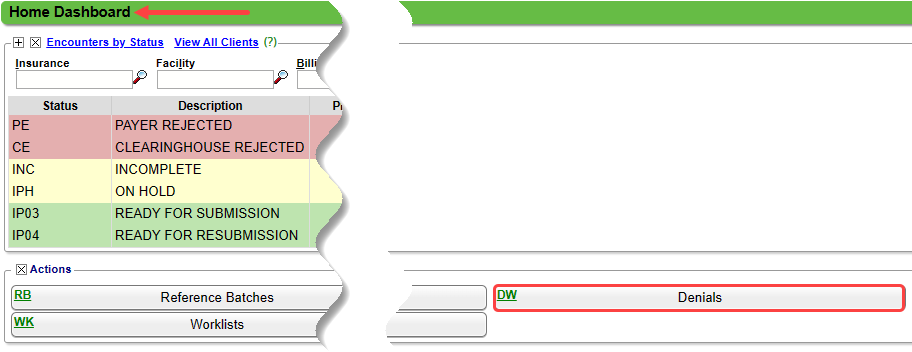
- (Home > Denials button in the Actions panel.
- There are fewer options on this Worklist than the other Worklists in the System.
- If you want more options when working the DW, the Remit can be added to another designated Worklist using the ERA Remit Items screen.
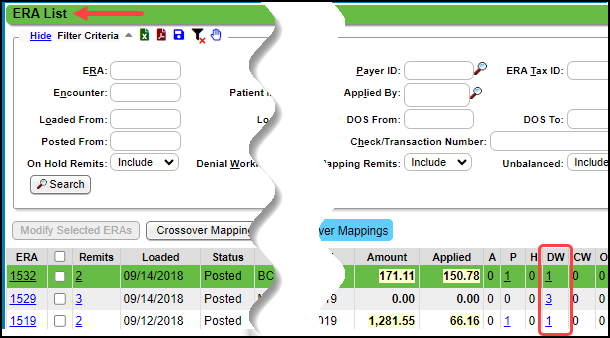
Example of DW: ERA 1532 was Applied. Encounter 5081 was denied and did not Post. It was placed on DW by the System due to a zero dollar Payment.
Access the Encounters on Individual ERAs placed on the Denial Worklist
- From the the ERA List screen by selecting the number in the DW Column;

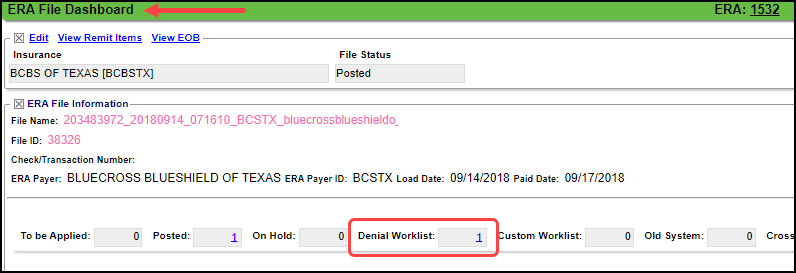
- On the ERA File Dashboard by selecting the number in the DW box;

Access all Encounters on the Denial Worklist
- On the Home Dashboard, select the Denials button.

- Enter dw in the Navigation Search Box.

Denial Worklist Filters
The Filters can be used to narrow the DW list.
- View: Summary or Detailed view.
- Remit and ERA: Enter a Remit or ERA Number.
- Patient: Enter a Patient ID or use the Lookup icon to search for a Patient.
- Include Zero Balance Encounters: Select the checkbox to include Encounters that have a zero balance.
- Encounter, Receipt, Insurance, Denial Code, Facility, Rendering, and Billing: Use the Lookup icon on the respective fields to filter for specific items.
- Takebacks: The options are Inclusive, Exclusive, Only
- DOS From and DOS To: Search using a range of Dates of Service.
- Patient and Insurance Bal >= and <=: Filter for specific balances.
- Charge, Paid, Applied, and Unapplied Amounts >= and <=: Filter for the specific criteria using greater than/equals to and/or less than/equals to.
- Unapplied Only: Select the checkbox to view unapplied Payments only.
- Include Inactive: Select the checkbox to include Inactive Patients.
- Tags and Tag Attributes: Search by Tags and/or Tag Attributes.
- Resolved Tags: Include, Exclude, or Only.
Denial Worklist Columns
- Interactive Columns: Remit, Patient, Encounter, ERA, and Receipt
- Other Columns
- Name: Patient's Name
- Assigned Encounter Tags
- These Tags also display on the Encounter
- There is a flag on the Encounter showing that the Encounter is on the Denial Worklist.
- Facility: The office where the Patient was seen.
- Encounter Insurance: The Patient's Insurance on the Encounter
- Ins Bal and Pat Bal: Insurance and Patient Balances
- Claim Type: How the Claim was processed: Primary, Secondary, or Tertiary
- Lines: Number of Line Items on the Claim
- DOS: Encounter Date of Service
- Charge: Total Amount of Charges on the Claim
- Paid: Total Amount that has been paid
- Applied and Unapplied: Amounts of the Total Paid that have been applied and unapplied.
Example of On Hold Remits on the ERA Remit Items screen:
- ERA 1528 was Applied.
- Three Encounters did not Post and were placed on Hold by the System.
- Remit 7936, Encounter 6806, was placed On Hold because a credit would be created if posted.
Learn More
Related Articles
Post DW (Denial Worklist) or On Hold (H) Remits
If a line item cannot auto-post when the ERA is Applied, the Encounter Remit will be placed on Hold or placed on the Denial Worklist (DW) for manual review. The Holds and DWs may have Payments or Denials that need to be posted or worked. Payments on ...Worklists Overview
A User can only see the Worklists if Permissions have been granted in User Maintenance. Organize your Workflow with Worklists Use Worklists to organize work by assigning Tasks with due dates and follow-up dates. Administrators control the information ...Post Denial Worklist or On Hold Remits (Table of Contents)
Table of Contents Denial Worklist Overview Post DW (Denial Worklist) or On Hold (H) RemitsDenial Analysis Overview
The Denial Analysis Report provides high-level reporting based on the CARC Management Setup. You can identify and categorize meaningful denials by setting up CARC Denial Rules. Preventable or Non-preventable denials: CARC codes can be designated in ...CARC Management & Denial Analysis Overview
CARC Management & Denial Analysis Reporting CARC Management and Denial Analysis provides the ability for Clients to identify, categorize, and manage their CARC codes and report on Denials. Using CARC Management, meaning denials can be identified and ...