Attach Encounters to an ERA
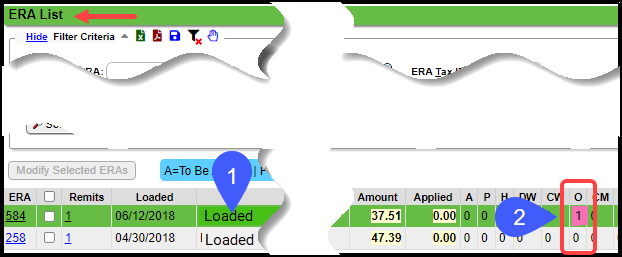
When ERAs are received, the Patient and Encounter number on the remit are matched to the Patient and Encounter in the system. When there is not a match or the account is 0, the remit and receipt are marked O (for Old system).
If the Patient and Encounter do exist in the system, you can link the Encounter to the remit before the remit is applied.
The Payer is truncating the Claim Account Number on the ERA
- The ERA may not be auto-matching to the Encounter because the number returned on the ERA is different than the number submitted on the Claim. The Claim Account Number is being truncated by the Payer.
- This makes it impossible to auto-match the Remit to the Encounter.
- Use the Account Number Limit field on the Payer Insurance Settings panel to fix this problem. See #15 after selecting the link above.
Alert: This must be done before the ERA is Applied.
Manually attach the ERA to the Encounter
- Do not apply the ERA. The ERA must be in Ready to Apply status for this to work.
- Select the number in the O column.
From the ERA Remit items screen, select View EOB for easy reference.
Select the 0 (zero) link in the Encounter Column to link the Encounter.
On the Charges pop-up window, find the Patient and DOS that matches the EOB. You can use the search filters to narrow your search.
Select the Encounter number to link.
Once you select the Encounter, it is linked and will no longer show on the list. You only have one chance to link the Encounter, so make sure you have chosen the correct Encounter.
Continue linking as needed. Once completed, you can apply the ERA as normal.
If you make a mistake when attaching an Encounter, it cannot be undone. See Attach New or Existing Receipt to an ERA.
Related Articles
Post a Zero ERA Payment with a Takeback
If the Remit has a Zero Dollar Payment, but it has Payments in the body of the Remit, there are probably Takebacks at the bottom of the Remit, which results in a Provider Level Adjustment. If the Payments in the body of the Remit equal the Takebacks ...Attach an Existing Receipt to an ERA
This is used when an Insurance Payment has already been posted manually, and then an ERA is received for that same Payment. The ERA can be attached to the existing receipt for the manually-posted Payment. Find the Receipt Number where this check was ...Split Encounters
Split Encounters Splitting Encounters allows you to separate specified Procedure lines from one Encounter to a new Encounter. This feature is available when entering or modifying a Charge and from the Encounter Dashboard. This is very useful for a ...Unapply an ERA
If a mistake is made when Applying an ERA or it does not post correctly, the entire ERA or a single Remit can be Unapplied. Unapply an Entire ERA In the Filter Criteria on the ERA List screen, choose Status, Posted. Click Search. Select the Remits ...Tag Workflows: Attach, Resolve, Delete
Tags can be worked from several areas in the System. Tagged Encounters Dashboard Encounter Dashboard Patient Dashboard (Balance Panel) Note: Tags that appear on the Patient Dashboard in the Balance Panel are Encounter Tags. Encounters by Status List ...


