Add a Copay on the Modify Charge Screen
Add a Copay on the Modify Charge Screen
If the Front Desk Users do not enter the Copays, they can be entered on the Modify Charge screen.
 Account Payments cannot be entered on the Modify Charge Screen.
Apply the Copay using the Popup
- If a Copay has been entered with the same Received date as the DOS of the Charge, a pop-up will display to select the Copay.
- Select the Receipt number to apply the copay to the first line of the Charge.
- Hover over View to see details of the Copay.
- Select the Modify icon to make changes to the Receipt.
Use the Receipt Tab to View the Patient's Receipts
- If there is no pop-up, select the Receipts tab to see if there has been a Patient Receipt created that has the same Received date as the Date of Service before selecting the Copay button.
- Receipts in Escrow can be seen on this tab.
If the Copay Receipt has already been entered, do not select the Copay button because it will create a duplicate Receipt.The Copay Pop-up was Manually Closed
- If you closed the Copay window, but still want to post the Copay, you can open the Modify Charge again, and the popup will display again; or
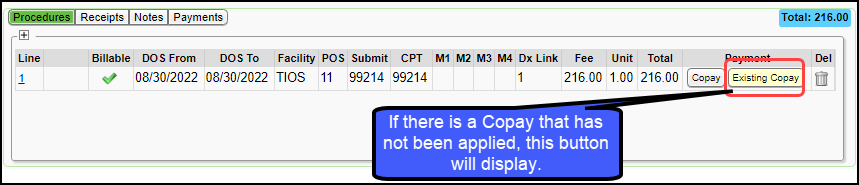
- Select the Existing Copay button to the right of the first Charge line to open the popup again.
Use the Receipt Tab to View the Patient's Receipts
If there is no pop-up, select the Receipts tab to see if there has been a Patient Receipt created that has the same Received date as the Date of Service before selecting the Copay button.
- Receipts in Escrow (not applied) can be seen on this tab.

Add a Copay
If the Copay Receipt has already been entered, do not select the Copay button because it will create a duplicate Receipt.
If a Copay was not found for this Encounter, you can add the Copay on the Procedure Tab.
- Select the Procedures Tab.
- Select the Copay button.

Related Articles
Incomplete Charge Review Overview
What are Incomplete Charges? These are Charges that have not been completed to send to the Payer. They are created by: Charges that have been sent from your Chart Documentation System; Charges that are Imported with the Import Tool; or Charges that ...Add/Process a Credit Card Payment
Add/Process a Credit Card Payment A Receipt can be created for a Patient or an Insurance Credit Card Payment. You must have merchant (credit card) service integration in place for this feature to be available. If you are not using one of the System ...Payment/Receipt FAQs
Adjustments/CARC Codes How can I post additional Adjustments? Post an Adjustment from: Payment Dashboard Patient Dashboard Encounter Dashboard Learn More Multiple Adjustment Lines Rebill the Claim from the Adjustment screen Adjustment Transaction ...Add/Modify a Reference Batch
On the Reference Batch List screen, you can add or modify a Reference Batch. Add a Reference Batch From the Reference Batch List page, select Add to create a new Reference Batch. The Batch Status defaults to Opened. Add a Description for the items to ...Modify a Charge
The Modify Charge screen is used to change or modify an existing Charge or Incomplete Charge. It is accessed from the Encounter Dashboard. Change the Rendering Provider If the Rendering Provider is modified on the Claim level, you have the option to ...